Follow Me On Social Media!


Leftover Ham and Cheese Scones: Savory Baking Made Easy
Got a fridge full of leftover ham after a big holiday feast? Don’t let it go to waste! Transform those cold cuts into something magical with these savory ham and cheese scones. Perfect for breakfast, brunch, or a quick snack,…
Ingredients
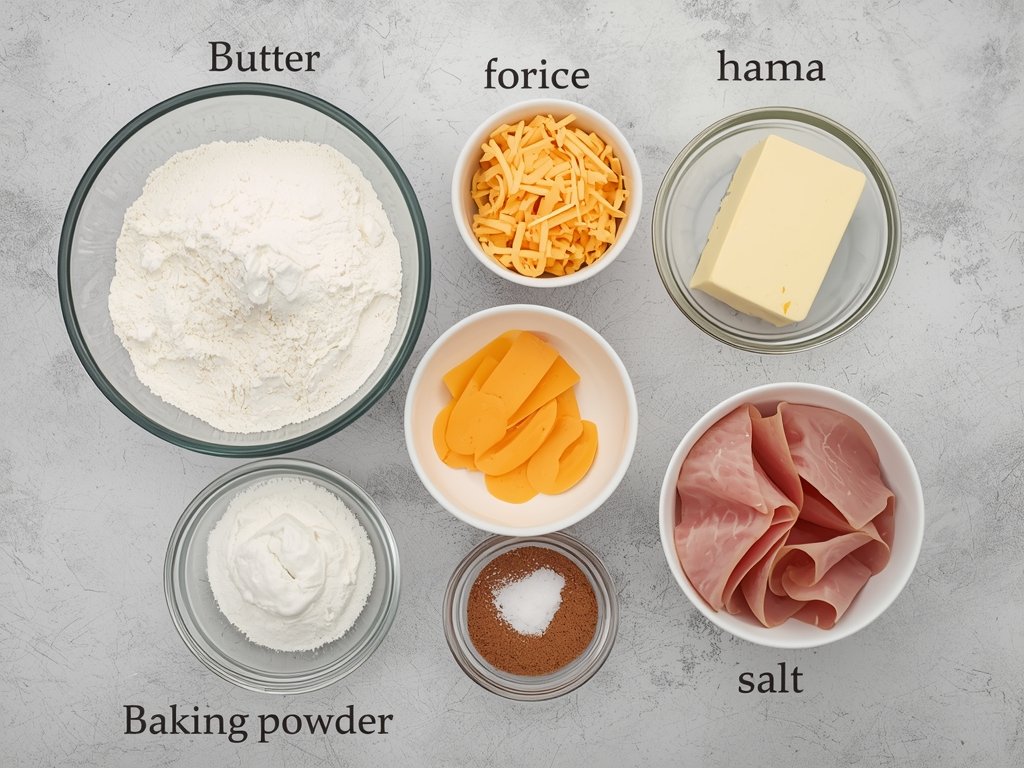
- 2 cups all-purpose flour
- 1 tbsp baking powder
- 1 tsp salt
- 1/2 cup cold unsalted butter, cubed
- 1 cup shredded cheddar or Gruyère cheese
- 1 cup diced leftover ham
- 3/4 cup buttermilk or substitute with milk and lemon juice
- 1 large egg for egg wash
Instructions
- Feel free to experiment with different cheeses or add herbs like chives or parsley for extra flavor. The key is to use what you have on hand and make it your own.
- Preheat your oven to 400°F (200°C) and line a baking sheet with parchment paper. In a large bowl, whisk together the flour, baking powder, and salt. Cut in the cold butter using a pastry cutter or your fingers until the mixture resembles coarse crumbs.
- Stir in the cheese and ham, then gradually add the buttermilk, mixing until the dough just comes together. Be careful not to overmix—a few lumps are fine!
- Turn the dough out onto a floured surface and pat it into a 1-inch thick circle. Cut the circle into 8-10 wedges, like a pizza. For a fancier look, use a biscuit cutter instead.
- Place the scones on the prepared baking sheet, leaving a little space between each one. Brush the tops with beaten egg for a golden finish.
- Bake the scones for 15-20 minutes, or until they’re puffed up and golden brown. Keep an eye on them—you don’t want them to overcook. Once done, let them cool on a wire rack for a few minutes before serving.
- These scones are best enjoyed warm, but they’ll stay fresh in an airtight container for up to 2 days. Reheat in the oven or toaster for that just-baked taste.
- While these scones are perfect for breakfast, they’re also great for lunch, dinner, or even as a party appetizer. Pair them with a simple salad, soup, or a smear of Dijon mustard for a complete meal.
Revive Your Leftovers: Ham and Cheese Scones to the Rescue

Got a fridge full of leftover ham after a big holiday feast? Don’t let it go to waste! Transform those cold cuts into something magical with these savory ham and cheese scones. Perfect for breakfast, brunch, or a quick snack, these scones are a delicious way to repurpose leftovers while keeping things fresh and flavorful.
Whether you’re a seasoned baker or a kitchen newbie, this recipe is straightforward, forgiving, and oh-so-satisfying. Plus, who doesn’t love a warm, flaky scone packed with cheesy goodness and bits of ham? Let’s dive into how you can turn yesterday’s leftovers into today’s star dish.
Why Scones? The Perfect Leftover Makeover

Scones are a versatile baked good that can be sweet or savory, making them the perfect canvas for leftover ingredients. Unlike bread or casseroles, scones come together quickly and don’t require hours of prep or rising time. They’re also incredibly portable, making them ideal for busy mornings or on-the-go meals.
The addition of ham and cheese elevates these scones from a simple baked treat to a hearty, satisfying meal. The salty ham pairs perfectly with the sharp cheese, while the scone’s buttery texture ties everything together. It’s comfort food at its finest, with a practical twist.
Ingredients: What You’ll Need
Before you start baking, gather your ingredients. Here’s what you’ll need for a batch of 8-10 scones:
- 2 cups all-purpose flour
- 1 tbsp baking powder
- 1 tsp salt
- 1/2 cup cold unsalted butter, cubed
- 1 cup shredded cheddar or Gruyère cheese
- 1 cup diced leftover ham
- 3/4 cup buttermilk (or substitute with milk and lemon juice)
- 1 large egg (for egg wash)
Feel free to experiment with different cheeses or add herbs like chives or parsley for extra flavor. The key is to use what you have on hand and make it your own.
Step-by-Step: Baking Your Scones

1. Prep Your Dough
Preheat your oven to 400°F (200°C) and line a baking sheet with parchment paper. In a large bowl, whisk together the flour, baking powder, and salt. Cut in the cold butter using a pastry cutter or your fingers until the mixture resembles coarse crumbs.
Stir in the cheese and ham, then gradually add the buttermilk, mixing until the dough just comes together. Be careful not to overmix—a few lumps are fine!
2. Shape and Cut
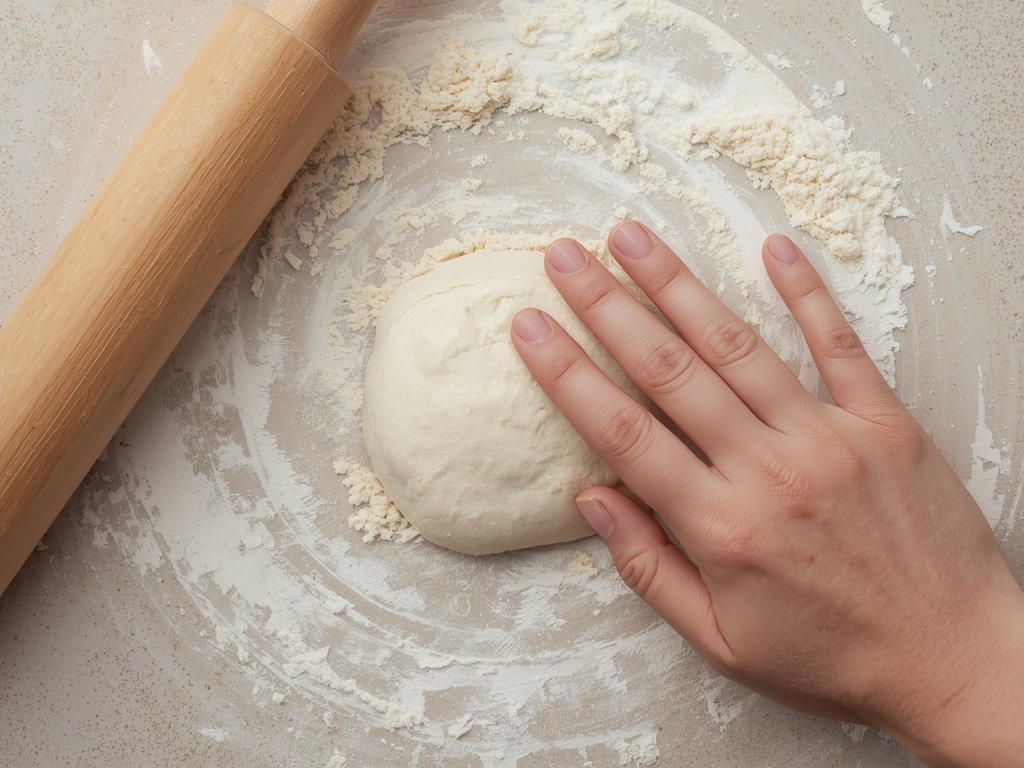
Turn the dough out onto a floured surface and pat it into a 1-inch thick circle. Cut the circle into 8-10 wedges, like a pizza. For a fancier look, use a biscuit cutter instead.
Place the scones on the prepared baking sheet, leaving a little space between each one. Brush the tops with beaten egg for a golden finish.
3. Bake to Perfection

Bake the scones for 15-20 minutes, or until they’re puffed up and golden brown. Keep an eye on them—you don’t want them to overcook. Once done, let them cool on a wire rack for a few minutes before serving.
These scones are best enjoyed warm, but they’ll stay fresh in an airtight container for up to 2 days. Reheat in the oven or toaster for that just-baked taste.
Serving Suggestions: Beyond Breakfast

While these scones are perfect for breakfast, they’re also great for lunch, dinner, or even as a party appetizer. Pair them with a simple salad, soup, or a smear of Dijon mustard for a complete meal.
For a brunch spread, serve them alongside scrambled eggs, fresh fruit, and a pot of coffee. They’re also fantastic for picnics or road trips—just wrap them in foil to keep them warm.
FAQ: Your Scone Questions Answered
Can I use other types of cheese?
Absolutely! Cheddar, Gruyère, Swiss, or even pepper jack work well. Choose a cheese that melts nicely and complements the ham.
What if I don’t have buttermilk?
No problem! Mix 1 cup of milk with 1 tablespoon of lemon juice or vinegar, let it sit for 5 minutes, and use it in place of buttermilk.
Can I freeze the scones?
Yes, you can freeze unbaked scones on a baking sheet, then transfer them to a freezer bag. Bake them straight from the freezer, adding a few extra minutes to the baking time.
How do I store leftover scones?
Keep them in an airtight container at room temperature for up to 2 days. Reheat in the oven or toaster for best results.
Can I add other ingredients to the scones?
Definitely! Try adding chopped green onions, jalapeños, or even sun-dried tomatoes for extra flavor.
Amara writes for the Tasty Remakes category, turning everyday leftovers into creative new dishes. Her recipes focus on practical transformations that save time and reduce food waste — proving that yesterday’s dinner can become today’s best meal.

← Previous
Leftover Brisket Stroganoff: Smoky, Creamy, and Irresistible
Next →
Leftover Waffle Sliders: Fried Chicken Meets Waffle Buns
Rate This Recipe
Tried this recipe? Share your experience and help others!