Saving the Knot: How to Fix a Rock-Hard Pretzel
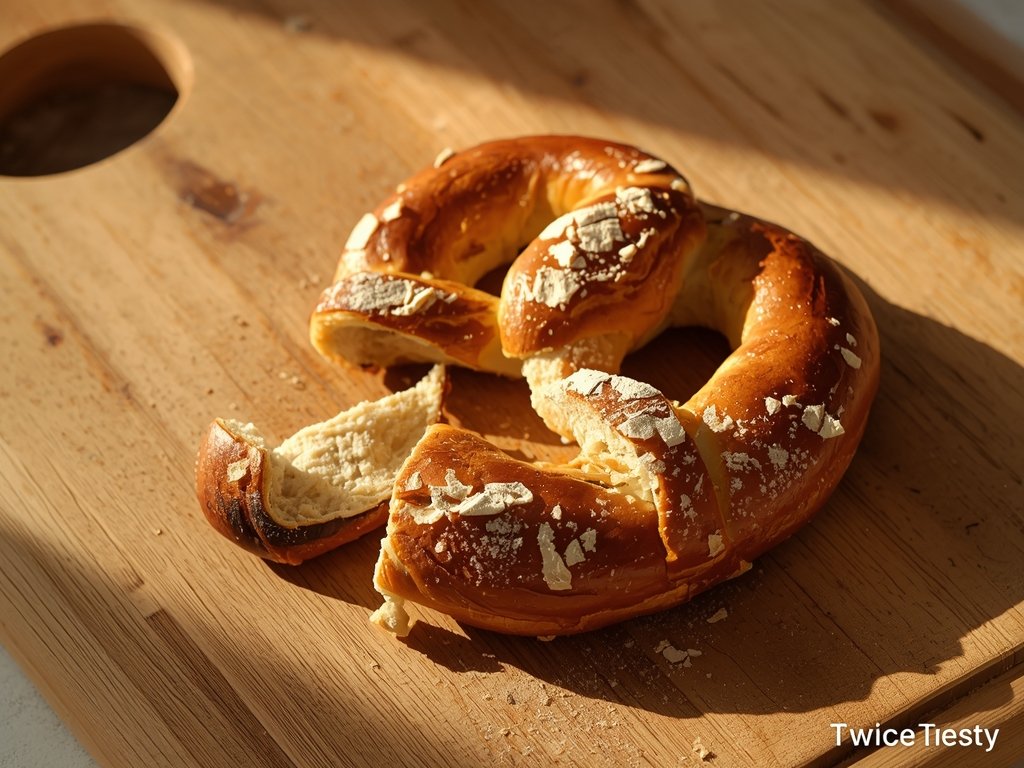
We have all been victims of the “next-day pretzel tragedy.” You bring home a bag of those giant, doughy twists from the game or the market, smelling faintly of beer and caramelized yeast. You eat one, maybe two, and shove the rest in the pantry for tomorrow. Fast forward twenty-four hours. You go in for a snack, and what you find is essentially a beige fossil. You pick it up, and it feels light as a feather—too light. You take a tentative bite, and crack. It snaps like a dry twig. The soft, pillowy interior has vanished, replaced by a dense, tough crumb that sucks the moisture right out of your mouth. It’s disheartening. You paid for that soft, chewy texture, and now you’re eating a savory dog toy.
Most people’s instinct is to throw it in the microwave. You wrap it in a paper towel, zap it for thirty seconds, and end up with something that feels like a hot, wet rubber ball. The outside is tough, the inside is steamed into a gummy paste, and the flavor has flatlined. Or, you try the toaster oven, only to burn the crust while the inside remains frozen in time. Neither works because a soft pretzel is a unique beast. It has a thick, alkaline crust that is designed to be tough, but inside, it needs to be hydrated. To bring it back, you can’t just heat it; you have to re-introduce water to the equation. You have to trick the dough into thinking it’s fresh out of the oven again.
Why the Pretzels Turn into Stones
To fix the texture, we need to look at what a soft pretzel actually is. It’s a dense, lean dough—usually just flour, water, yeast, and maybe a little butter or fat—that gets a brief bath in an alkaline solution (baking soda or food-grade lye) before baking. That bath is what gives the pretzel that deep, mahogany color and that distinctive, savory “pretzel” flavor. It also gelatinizes the surface starch, creating a thick, somewhat chewy skin.

When you leave a pretzel out, that thick skin acts as a barrier. But unlike a loaf of artisan bread with a hard crust, a pretzel’s skin is thinner and more prone to drying out completely. Meanwhile, the moisture inside the dough migrates outward. Since the crust is drying out, it traps that escaping moisture right underneath the surface, creating a weirdly dry-yet-dense texture. This is starch retrogradation at work; the starch molecules are crystallizing and squeezing out water, turning the soft crumb into a hard, dense mass.
The microwave fails because it adds water too fast. It boils the water inside the dough, expanding the steam pockets and blowing the structure apart, turning the crumb into a gummy mess while the hard crust stays hard. The oven alone fails because it’s a dry heat environment; it pulls even more moisture out of the crust, making it harder. We need a method that penetrates that tough outer shell and plumps up the interior starch before we apply the heat.
The “Quick-Dip” Rehydration Method
Here is the secret that delis and stadiums use, and it’s so simple it feels like a cheat code. You don’t wrap it in foil, and you don’t spray it with a mister. You have to commit. You have to get the pretzel wet.
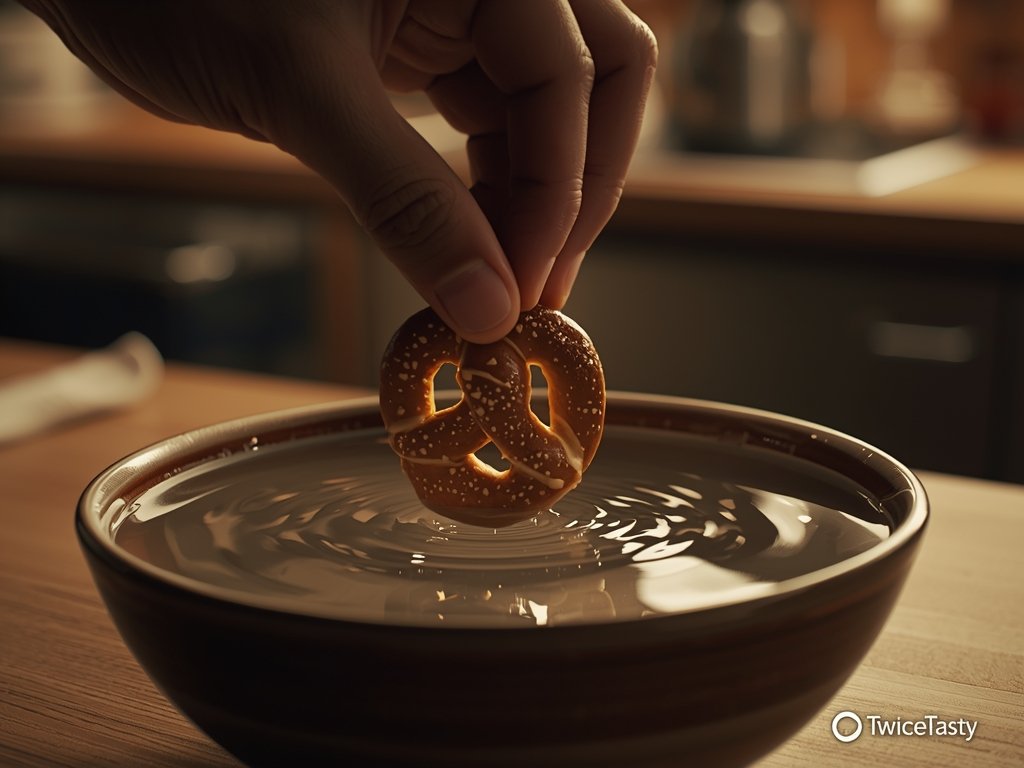
Grab a shallow bowl and fill it with warm tap water. You don’t need to soak it like a sponge; you just want to rehydrate the surface. Take your rock-hard pretzel and dip the top of it—just the crown—into the water for about three to five seconds. If the pretzel is really thick, give it a quick flip and dunk the bottom half, but don’t leave it submerged. You’re not making soup. You’re just waking up the dormant yeast and starches on the outside, giving them the water they need to turn back into steam in the oven.
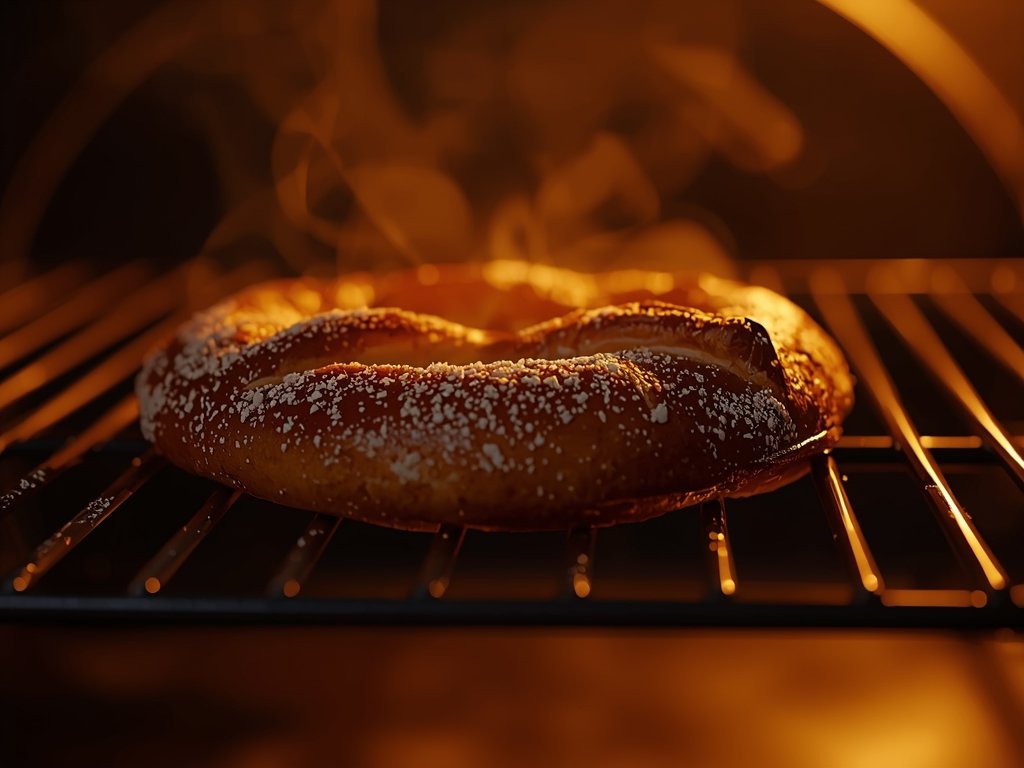
Place the wet pretzel directly on a baking sheet or a wire rack. If you still have that coarse salt on there, some of it might wash off, but don’t worry about that right now. We’ll fix the seasoning later. The water you just applied is going to act as a heat conductor and a moisturizer. As the oven heats up, that layer of water will turn to steam, softening that rock-hard crust instantly. The steam will also penetrate the first few millimeters of the dough, relaxing the gluten strands that tightened up in the fridge.
Slide the tray into a preheated oven set to 350 degrees. You don’t need it crazy hot. We want a gentle bake. Let it sit there for about 5 to 8 minutes. What’s happening inside is beautiful: the water on the surface is evaporating, keeping the crust from drying out too fast while the heat travels through the dough, warming the dense interior. The starches that had crystallized are absorbing that new moisture and melting back into a soft, gel-like state. It’s essentially un-baking the staleness.
The Golden Window of Warmth
The smell is the best indicator. Your kitchen will start to smell like yeast, toasted flour, and that distinct lye tang. That’s the chemistry working. It should smell inviting, not burnt. When you pull it out, the exterior should look matte and damp, not shiny and greasy. Let it sit on the counter for just one minute. This is the “setting” phase where the crust firms up slightly, but not back into a rock.
Touch it. It should have some give. It should feel like a soft bread again, not a stone. If you break it open, the inside should be steaming and tender, pulling apart in soft, stringy fibers rather than snapping. The contrast between the chewy, now-softened crust and the warm, fluffy inside is what we are chasing.
If you want a little bit of snap back—some people hate a soggy crust—crank the oven to broil for the last 30 seconds. Watch it like a hawk. You just want to dry the surface moisture so it gets a tiny bit of skin back, but you have to be careful. The sugars in the dough (and the alkaline coating) burn fast. You want a deep golden color, not charcoal. But honestly, I prefer the “all soft” approach for leftovers. The crispness is a first-day luxury; the second day is all about comfort and chew.
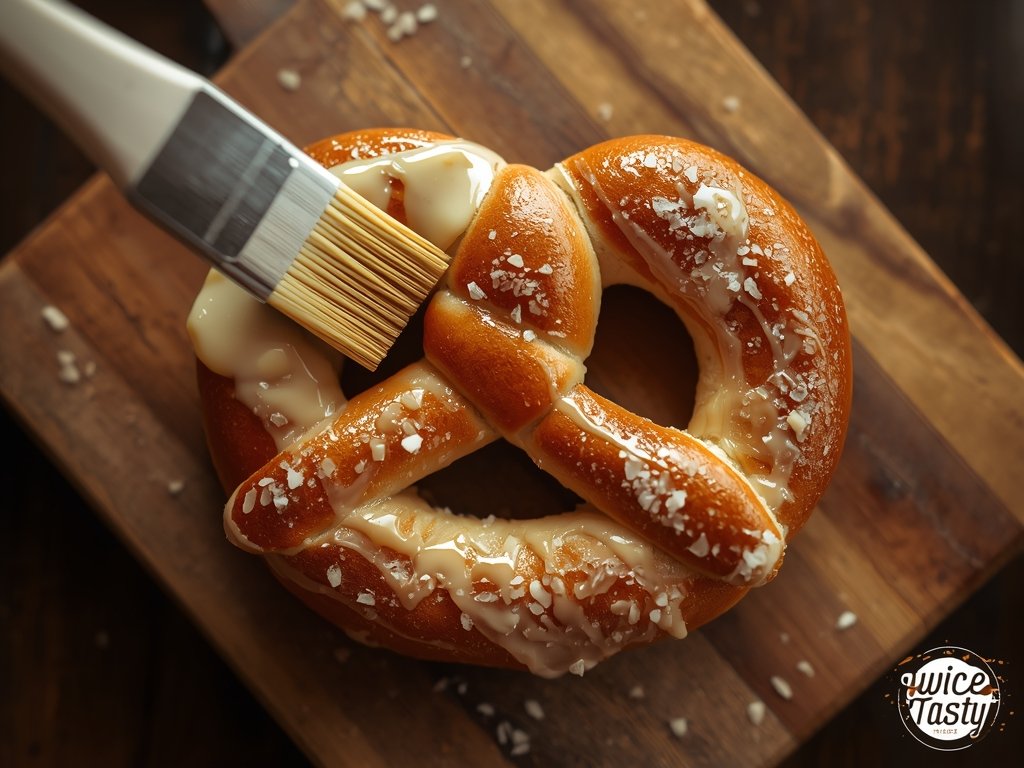
The Butter-Salt Finish: Better Than the Original
This is the upgrade that separates the “reheated snack” from the “I can’t believe I made this at home” experience. Remember, we lost a lot of that pretzel salt in the water bath. And cold, reheated dough can sometimes taste a little bland compared to the fresh yeastiness of a new batch. We need to add fat and salt, and we need to do it while the pretzel is piping hot.
Melt some butter—real butter, unsalted is best so you can control the seasoning. Brush that melted butter all over the warm pretzel. Do it generously. The butter will sizzle as it hits the hot crust, seeping into those microscopic cracks we just rehydrated. It adds richness that the original pretzel might have lacked, especially if it was a cheap supermarket version.
Then, while the butter is still wet, take a small pinch of coarse kosher salt or flaky sea salt and sprinkle it over the top. It will stick perfectly to the butter. You’ve effectively re-seasoned the exterior. The salt hits your tongue first, followed by the rich butter, and then the warm, chewy dough. It’s a flavor bomb. If you want to get really fancy, mix a little garlic powder or everything bagel seasoning into that melted butter before you brush it on.
Suddenly, that stale rock isn’t just “edible again.” It’s a gourmet treat. It’s warm, it’s salty, it’s buttery, and the texture is softer and more yielding than it was when you first bought it because you manually controlled the hydration. It’s the perfect companion for a cold beer or a slice of cheese. You didn’t just save a snack; you mastered the chemistry of starch.
Frequently Asked Questions
Can I freeze soft pretzels to keep them fresh?
What if I don’t have an oven? Can I use a microwave? You can, but you have to be careful. Wrap the pretzel in a damp (not soaking wet) paper towel. Microwave on high for 20-30 seconds. The towel creates a steam pocket. It won’t be as good as the oven method—the crust will be softer than ideal—but it’s better than eating a rock. Eat it immediately; it gets hard again fast in the microwave.
Why does the crust get that dark, shiny color? That’s the Maillard reaction combined with the alkaline baking soda or lye bath. The high pH of the surface breaks down proteins and sugars, allowing them to brown faster and develop that distinct roasted, nutty flavor that you can’t get from just bread dough. It’s also why the crust tastes different than regular bread crust.

The Twice Tasty Team is a collective of culinary researchers and kitchen gear experts dedicated to the art of food revival. We test every technique in our “Flavor Lab” to help you reduce food waste and transform yesterday’s meals into gourmet experiences. Professional quality, tested results.